How to check .NET Framework version
You can check the .NET Framework version installed on your Windows 11/10 computer in any of the following ways: Let’s take a look a the description of the necessary step in relation to each of the methods.
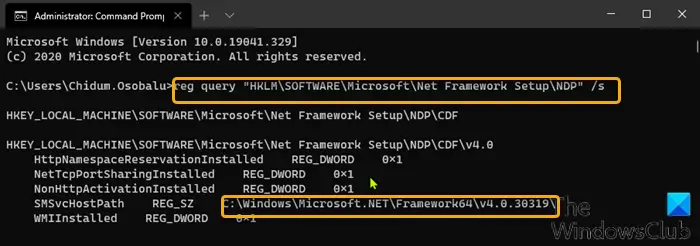
1] Check .NET version using Command Prompt
To check the version of the .NET Framework installed on Windows 10 using Command Prompt, do the following:
Press Windows key + R to invoke the Run dialog.In the Run dialog box, type cmd and then press CTRL + SHIFT + ENTER to open Command Prompt in admin/elevated mode.In the command prompt window, copy and paste the command below and hit Enter.
2] Check .NET version using Registry Editor
To check the version of the .NET Framework installed on Windows 10 using Registry Editor, do the following:
Press Windows key + R to invoke the Run dialog.In the Run dialog box, type regedit and hit Enter to open Registry Editor.Navigate or jump to the registry key path below:
Select the main version key – for example, v4 or v4.0.Select the Client key.
Note: In releases older than version 4, the key will be a number or “Setup.” For example, .NET version 3.5 includes the version number under the 1033 key.
3] Check .NET version using PowerShell
To check the version of the .NET Framework installed on Windows 10 using PowerShell, do the following:
Press Windows key + X to open Power User Menu.Then press A on the keyboard to launch PowerShell in admin/elevated mode.In the PowerShell console, copy and paste in the command below and hit Enter.
Once the command executes, the output should reveal the information for both client and the full version of .NET installed on your device (if applicable). Read: Troubleshoot .NET Framework Installation Issues.
4] Check .NET version using .NET Version Detector tools
DotNetVersionLister
There’s a community tool at GitHub that makes it easy to query a list of installed .NET versions on your computer.
To use this DotNetVersionLister to check the .NET version installed on Windows 10 PC, do the following:
Open PowerShell in admin/elevated mode.In the PowerShell console, copy and paste in the command below and hit Enter to download and install this tool on your device.
Type Y and hit Enter.Next, type the following command to determine the version of .NET installed and hit Enter:
Once the command executes, the output should reveal the information for the version of .NET installed on your device.
ASoft .NET Version Detector
ASoft .NET Version Detector is a lightweight tool that gives information on the different versions of Microsoft .NET and .NET Core that are installed on a Windows computer. You can download it from here.
5] Via File Explorer
Open File Explorer and navigate to the following folder: Here you can see all the versions that are installed. That’s it on the ways to check the .NET version on your Windows 11/10 PC.