The technical error message is WU_E_AU_NOSERVICE. This means that a Service related to Windows Update could have malfunctioned.
Windows Update Error Code 8024A000
To fix Windows Update Error Code 8024A000, follow these suggestions: Before you begin, create a system restore point first. If you ever change your mind then in such a case, it will help you to ever revert the undesirable changes. I would suggest you try them in a sequence way as it is done here. Let us see them in detail –
1] Run the Windows Update Troubleshooter
Windows Update Troubleshooter is a built-in tool that can effectively fix the common problem associated with the Windows Update. It checks the status of services related to the process and then restarts the system if required. In order to run it, navigate to the Windows Settings (Win+I) > Updates and Security > Troubleshoot. Now, move to the right pane, scroll a bit and then run the Windows Updates Troubleshooter. Once you complete the process, restart your device and check if it solves the problem. Otherwise, move down to the next potential workaround.
2] Restart the Windows Update Services
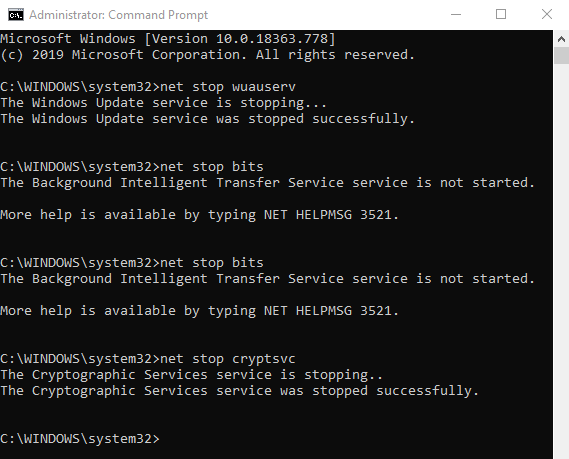
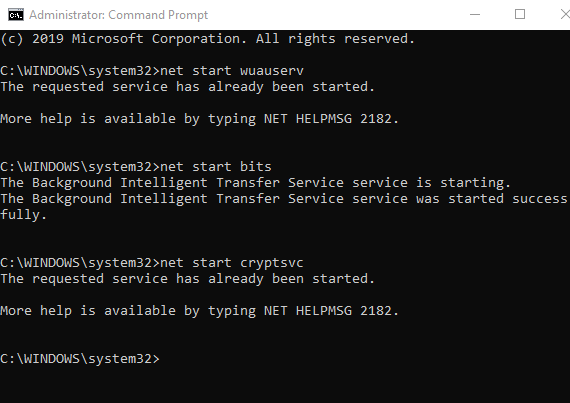
Sometimes, this problematic error can also occur because of the Windows Update service that appears to be stuck at a particular point. As per some user’s report, they have overcome the issue by restarting every single service used by the Windows Update component. To restart the Windows Update Services, open an elevated command prompt. If UAC prompt appears on the screen, click on the Yes button to give your approval.
In the elevated command prompt window, type the following commands and press enter after each one – This will stop the Windows Update services. To start these services again, type the following command and hit enter after each one.
After executing the above commands, restart your device and check if it fixes the issue.
3] Register Windows Update related DLLs again
There is another possibility of occurring the error code 8024A000, that is the DLL file. Maybe it is not registered in the accurate form. By the way, it is mainly reported to have occurred on the older Windows version. If it is related to your current conditions, you need to again register the DLL update. To do this, click on the Start button and type Notepad. From the best match list, do a right-click on the result and select Run as administrator. If UAC prompts on the screen, click on the Yes button to grant the administrative privileges. Inside the elevated Notepad, copy and paste the following commands – Now, click on the File menu and select the Save as option. On the next screen, choose a suitable location and then save the file as WindowsUpdate.bat. By the way, you can change the file name as per your need but the extension of the file name must be a batch file. Once you create the batch file, double click on it, and when UAC prompts on the screen, click on the Yes button. After that, reboot your device and once it starts up, check if the error code 8024A000 still persists. If it is, then move down to the next effective workaround.
4] Performing SFC and DISM Scans
5] Troubleshoot in Clean Boot State to fix Error Code 8024A000
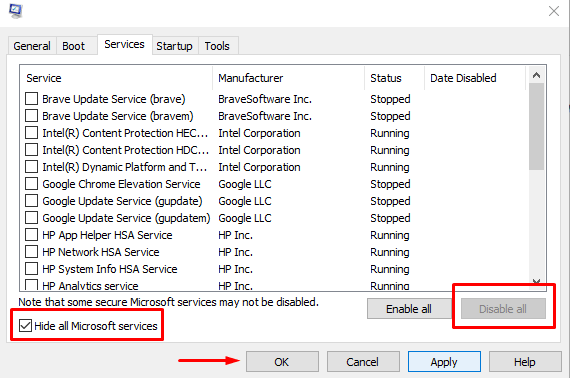
Unfortunately, if none of the above workarounds have helped you to fix this issue, you could consider performing a clean boot on your computer. Clean-boot troubleshooting is designed to isolate a performance problem. To perform clean-boot troubleshooting, you must take a number of actions, and then restart the computer after each action. You may need to manually disable one item after another to try and pinpoint the one that is causing the problem. Once you have identified the offender, you can consider removing or disabling it. Press Window+R shortcut key to launch the Run dialog box. In the field, type MSConfig and hit enter. If UAC prompts, simply click on the Yes button. Once you’re in the system configuration window, go to the Services tab and mark next to the Hide all Microsoft services checkbox. After that, click Disable all > Apply > OK.
Now, move to the Startup tab and click on the Open Task Manager link. On the following window, select each startup item one by one and make it disable. Thereupon close the window and reboot your computer. If the issue is resolved now then fine, otherwise again open the System Configuration window and move to the General tab. Then mark the checkbox next to the Load System Services. Now, click the Apply > OK button to save the changes and restart it again. Now once in Clean Boot State, you may run Windows Update again and see if it help you.


